
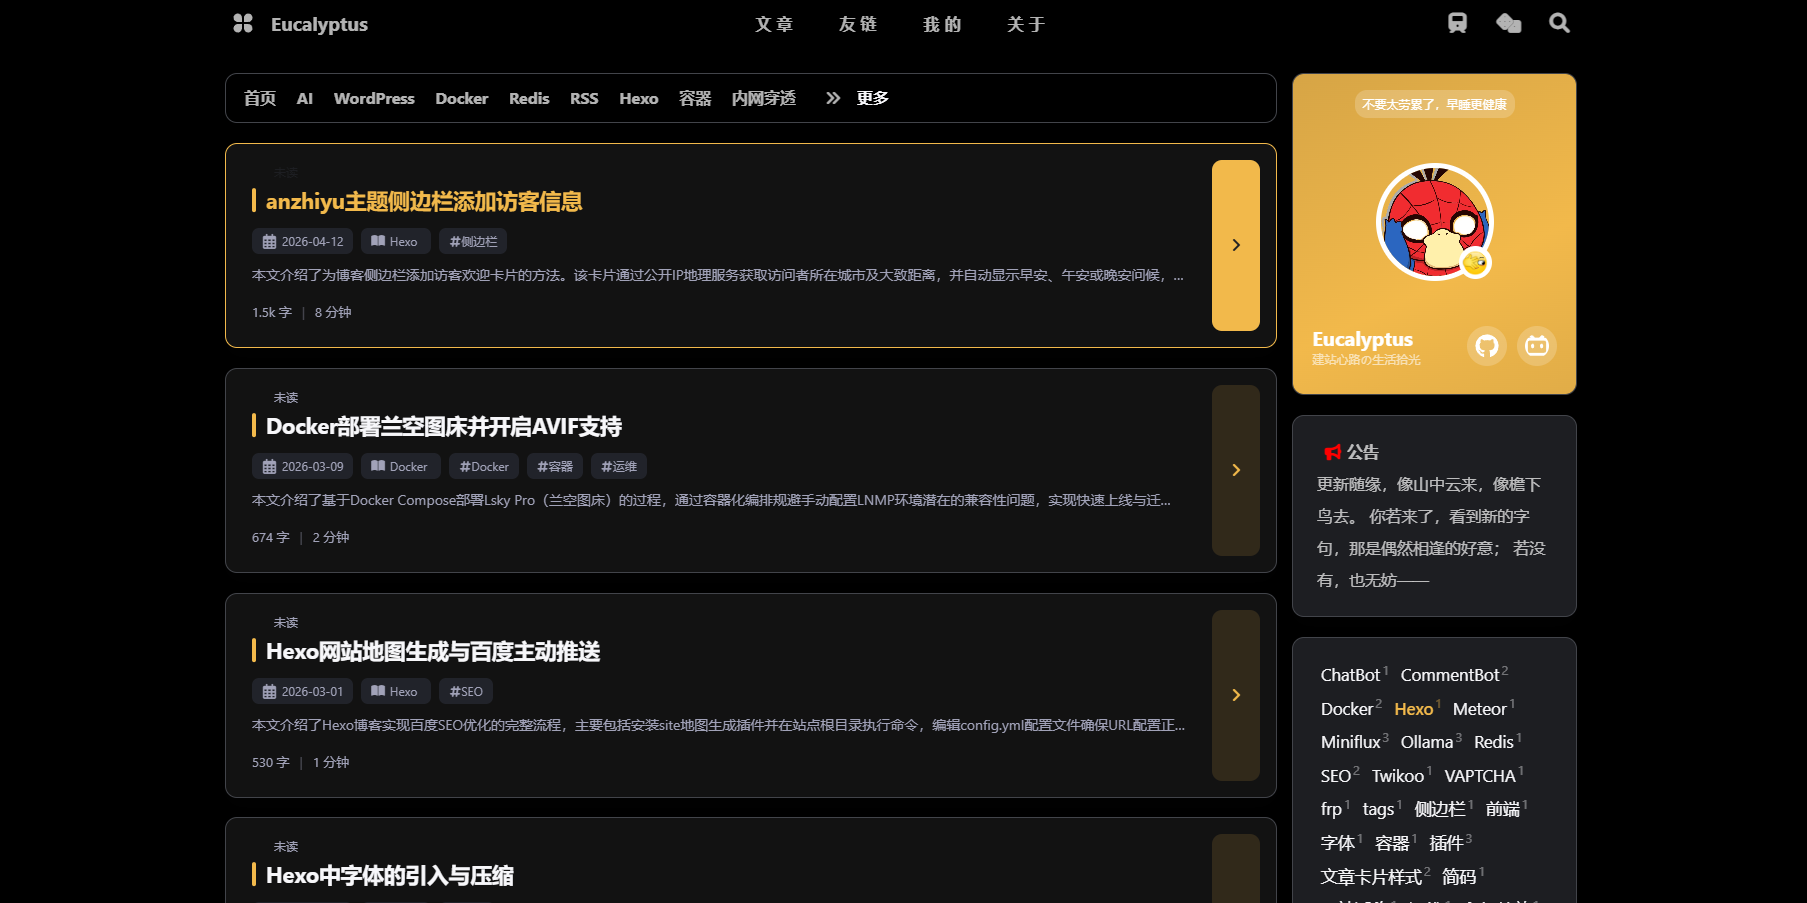
新增列表卡片:无封面排版 + AI 摘要动态拉取

前言

之前给博客做过一版「横向卡片」(配置项叫 home_card_style: horizontal),后来主题更新,那套模板和 CSS 一起没了,配置项也变成了孤儿。这次换个思路:不另写模板,直接在 post-ui.pug 里加分支,用一个整数开关切换「封面卡片」和「列表卡片」。

顺带解决了另一个更烦的问题:卡片里那句摘要。

以前它是「正文去掉 HTML 标签后截取 500 字」,也就是文章开头那句话。而文章页顶部明明有一块 AI-摘要,是真正的总结。为什么不直接把那段搬过来?

这篇文章就记录这两件事:怎么加一张卡片,以及怎么让卡片里的摘要真的”活”起来——不是抄一份快照,而是跟着服务端缓存自动更新。

示例:
正文

文件路径分布

1
2
3
4
5
6
7
8
9
10
11
12
13
14
15
blog/
├── _config.anzhiyu.yml # post_card_style 开关
├── source/_data/ai_summary.json # 构建时兜底的摘要快照
├── themes/anzhiyu/
│ ├── layout/
│ │ ├── index.pug # 引入卡片摘要脚本
│ │ └── includes/
│ │ ├── mixins/post-ui.pug # 卡片结构 + 分支
│ │ └── head/config_site.pug # 把 abbrlink 注入全局变量
│ └── source/
│ ├── css/_extra/post_card_list/index.css # 列表卡片样式
│ └── js/anzhiyu/
│ ├── ai_abstract.js # 文章页:请求时带上 abbrlink
│ └── card_summary.js # 首页:按 abbrlink 拉摘要
└── ...

css/_extra/ 下的文件会被 themes/anzhiyu/source/css/index.styl 里的 @import '_extra/**/*.css' 自动收录,所以新增样式文件不用改入口。

一、开关:一个整数,两套版式

1
2
3
4
5
6
7
# 首页双栏显示
article_double_row: true

# 文章卡片样式(首页 / 分类 / 标签页的文章列表)
# 1 = 封面卡片(默认,配合 article_double_row 双栏显示)
# 2 = 列表卡片:无封面,标题左侧竖条 + 日期/分类/标签胶囊 + 摘要 + 字数·阅读时长 + 右侧箭头
post_card_style: 2

二、模板:只加分支,不另写文件

原来的 mixin 是「有封面就渲染封面,没封面就整行文字」。列表卡片要的是”永远没有封面,但内容重新排布”,所以在 mixin 顶部算出两个变量,后面按条件走:

1
2
3
4
5
6
7
mixin postUI(posts)
- const cardStyle = theme.post_card_style || 1
- const isListCard = cardStyle === 2
- const showListWords = isListCard && theme.wordcount.enable && theme.wordcount.post_wordcount
each article , index in page.posts.data
- let link = article.link || article.path
div(class = (index === 0 ? 'recent-post-item lastestpost-item' : 'recent-post-item') + (isListCard ? ' post-list-card' : '') data-abbrlink=(isListCard ? (article.abbrlink || '') : '') onclick=`pjax.loadUrl('${url_for(link)}')`)

三点改动:

  1. 卡片多了 post-list-card 类,CSS 全部挂在这个类下面,别的版式完全不受影响;
  2. data-abbrlink 留给后面的摘要脚本用(abbrlink 是 hexo-abbrlink 生成的短链,唯一且稳定);
  3. 封面那一段加 && !isListCard,列表卡片不渲染 .post_cover。

分类的位置也变了:封面卡片把它塞在标题上方的小字里,列表卡片把它做成胶囊放到元信息行。所以分类渲染也加了条件:

1
2
3
if (!isListCard && theme.post_meta.page.categories && article.categories.data.length > 0)
each item, index in article.categories.data
.article-categories-original=item.name

元信息行里(日期之后)再补一个分类胶囊,多级分类合成一个,用 / 连接:

1
2
3
4
5
6
7
if (isListCard && theme.post_meta.page.categories && article.categories.data.length > 0)
span.post-list-card-category
i.eucalyptus.icon-book-open
each item, idx in article.categories.data
if idx > 0
span.post-list-card-cat-sep= '/'
a.post-list-card-cat-link(href=url_for(item.path) title=item.name onclick="window.event.cancelBubble=true;")= item.name

正文后面追加字数、阅读时长和右侧箭头(箭头是卡片的直接子元素,方便绝对定位到整卡高度):

1
2
3
4
5
6
7
8
9
10
11
if showListWords || showListMin2read
.post-list-card-footer
if showListWords
span= wordcount(article.content) + ' 字'
if showListWords && showListMin2read
span.post-list-card-sep |
if showListMin2read
span= min2read(article.content, {cn: 350, en: 160}) + ' ' + _p('post.min2read_unit')
if isListCard
span.post-list-card-arrow
i.eucalyptus.icon-angle-right

三、样式:全部挂在一个类下面

1
2
3
4
5
6
7
8
9
10
11
12
13
14
15
16
17
18
19
20
21
22
23
24
25
26
27
28
29
30
/* 卡片外壳:注意这里用 width:auto,不是 100% */
#recent-posts > .recent-post-item.post-list-card {
display: block;
width: auto;
height: auto;
padding: 22px 88px 22px 26px; /* 右边留出箭头的宽度 */
box-sizing: border-box;
border: var(--style-border);
border-radius: 12px;
}

/* 标题左侧那条竖线:用伪元素,才能有圆角和垂直居中 */
#recent-posts > .recent-post-item.post-list-card .article-title {
position: relative;
padding-left: 14px;
font-size: 1.35rem;
-webkit-line-clamp: 2;
}

#recent-posts > .recent-post-item.post-list-card .article-title::before {
content: "";
position: absolute;
left: 0;
top: 50%;
width: 4px;
height: 1.1em;
transform: translateY(-50%);
border-radius: 4px;
background: var(--anzhiyu-main);
}

颜色全部用主题变量(--anzhiyu-main / --anzhiyu-secondbg / --anzhiyu-theme-op),所以换主题色、深浅色模式都不用改样式。箭头那块淡色底用的是 --anzhiyu-theme-op(主色的 14% 透明度)。

四、踩到的五个坑

# 现象 原因 解法
1 列表卡片被压成两列窄条 article_double_row: true 在 ≥1201px 上给 .recent-post-item 设了 width: 49% 用 #recent-posts > .recent-post-item.post-list-card 提高权重,显式 width: 100%
2 移动端卡片溢出屏幕右侧 我把 width: 100% 当默认值,而手机端卡片还有 margin: 20px 默认改 width: auto,只在 ≥1201px 的媒体查询里写 width: 100%
3 两个分类出现两个书图标 每个分类渲染一个胶囊 改成”一个胶囊装所有分类”,用 / 分隔
4 摘要不显示 主题全局有一条 .content { opacity: 0; height: 0 }(双栏版式为了省略摘要) 列表卡片显式 opacity: 1; height: auto
5 改完样式没生效 Hexo 只按入口文件 mtime 判断,_page/*.styl、_extra/*.css 改了不会触发 CSS 重编译 hexo clean && hexo generate

第 4 条值得多说一句:我一开始以为是”摘要没渲染”,查了半天模板,其实 HTML 里一直有 .content 节点,只是被 CSS 藏起来了。先看 DOM,再看 CSS,能省一半时间。

五、让摘要真的变成”摘要”

5.1 第一版:静态 JSON

最省事的做法是抓一遍,存成数据文件,模板里直接读:

1
2
3
4
- const listAiSummary = isListCard && site.data.ai_summary ? site.data.ai_summary[article.abbrlink] : null
case listAiSummary ? 4 : theme.index_post_content.method
when 4
.content!= listAiSummary

_data/ai_summary.json 长这样,按 abbrlink 索引:

1
2
3
4
{
"16496380": "本文介绍了一套基于大模型能力为 Hexo 博客自动生成拟人化评论的系统……",
"83caee76": "本文介绍了基于 Ollama 的 AI 摘要生成系统部署与 Hexo 主题集成方案……"
}

能跑,但有个死穴:它是快照。Redis 里的摘要重新生成、过期、或者你发了新文章,这个文件不会自动变,只能再抓一遍。

5.2 为什么首页拿不到摘要

看一下摘要服务的逻辑(Node + Express + Redis):

1
2
3
4
function getCacheKey(text) {
const contentHash = crypto.createHash('md5').update(text.slice(0, 4000)).digest('hex').substring(0, 16);
return `ai:summary:${contentHash}`;
}

缓存键是正文清洗后的前 4000 字的 md5,不是文章 ID、不是 URL。

文章页能拿到摘要,是因为它自己在文章里,可以就地提取正文、算出这个指纹:

1
文章页 → getArticleText() 清洗正文 → md5 → 查 Redis → 命中/生成 → 显示

而首页只有标题和一句摘要,没有正文,算不出指纹,也就查不到。

顺带排掉两个误区:

  • cache-admin.sh list 里那个 ID(001、002……)是 sort | nl 每次现算的行号,不是持久标识,增删任何一条,后面全部漂移;
  • Redis 里根本没有”这篇文章对应哪条摘要”的映射,只有一串摘要正文和它们的 md5。

5.3 顺手排掉的一个隐性问题

调试时发现同一个 URL,带 Origin 请求有时拿不到跨域头:

1
2
curl -H "Origin: https://blog.eucalyptus.cc" "…/api/summary?key=p:83caee76"      # 没有 ACAO
curl -H "Origin: https://blog.eucalyptus.cc" "…/api/summary?key=p:83caee76&cb=1" # 有

原因是宝塔的全局配置 /www/server/nginx/conf/proxy.conf 里开着:

1
proxy_cache cache_one;

它给所有反代站点加了一层缓存,缓存键是 $scheme$proxy_host$request_uri,不区分 Origin。于是”第一次谁访问的”决定了这份缓存里有没有 Access-Control-Allow-Origin——浏览器第二次来就撞上空头,跨域失败。

解法是在响应里加一行,让 nginx 别缓存这条响应:

1
res.set('X-Accel-Expires', '0');

X-Accel-* 是 nginx 认的控制头,0 表示不缓存。加上之后同样的测试就稳定了。

5.4 最终方案:给每篇文章加一张”目录卡”

既然键算不出来,那就在写摘要的时候,额外按文章标识存一份。

服务端只加两个地方:

1
2
3
4
5
6
7
8
9
10
11
12
13
14
// 写入时(POST /api/ai-summary),如果带了 key,就多存一份
const alias = normalizeAliasKey(req.body && req.body.key); // 只接受 p:<字母数字>
await redis.setex(cacheKey, config.CACHE_TTL, summary);
await saveAlias(alias, summary); // → ai:summary:p:<abbrlink>

// 新增只读接口,永远不触发生成
app.get('/api/summary', async (req, res) => {
const alias = normalizeAliasKey(req.query.key);
if (!alias) return res.status(400).json({ error: 'Bad key' });
const summary = await redis.get(`ai:summary:${alias}`);
res.set('X-Accel-Expires', '0');
res.set('Vary', 'Origin');
res.json({ summary: summary || null, cached: Boolean(summary) });
});

文章页的请求体里带上 abbrlink:

1
2
3
4
5
6
const requestBody = {
text: articleText.slice(0, 4000),
force: forceRefresh
};
const aliasKey = getAliasKey(); // → 'p:83caee76'
if (aliasKey) requestBody.key = aliasKey;

abbrlink 从 GLOBAL_CONFIG_SITE 里取,在 head/config_site.pug 注入:

1
abbrlink: '!{abbrlinkVal}',

首页每个卡片只要认自己的 data-abbrlink,就能直接问:

1
fetch(API + '?key=' + encodeURIComponent('p:' + abbrlink))

完整的卡片脚本(3 并发、失败静默、命中才替换):

1
2
3
4
5
6
7
8
9
10
11
12
13
14
15
16
17
18
19
20
21
22
23
24
25
26
27
28
29
30
31
32
33
(function () {
const API = 'https://abstract.eucalyptus.cc/api/summary';
const cards = Array.prototype.slice.call(
document.querySelectorAll('.recent-post-item.post-list-card[data-abbrlink]')
);
if (!cards.length) return;

let cursor = 0;

function updateCard(card) {
const abbrlink = (card.getAttribute('data-abbrlink') || '').trim();
const content = card.querySelector('.recent-post-info > .content');
if (!abbrlink || !content) return Promise.resolve();

return fetch(API + '?key=' + encodeURIComponent('p:' + abbrlink), { credentials: 'omit' })
.then(res => res.ok ? res.json() : null)
.then(data => {
const text = data && typeof data.summary === 'string' ? data.summary.trim() : '';
if (!text) return;
if (text === (content.textContent || '').trim()) return;
content.textContent = text;
content.setAttribute('data-summary-source', 'live');
})
.catch(() => {});
}

function next() {
if (cursor >= cards.length) return Promise.resolve();
return updateCard(cards[cursor++]).then(next);
}

for (let i = 0; i < 3; i++) next();
})();

注意这段脚本只是”升级“,不是”加载”:首屏渲染的还是构建时 _data/ai_summary.json 里那份,脚本只是拿最新值覆盖。所以接口挂了、跨域被挡、Redis 里没这条,页面都照常显示,只是看不到更新。

六、结果

  • 首页 10 张卡片,服务端渲染时就带着摘要,首屏不空;
  • 脚本再发 10 个轻量 GET(3 并发),命中就把文字替换成 Redis 里的最新版本,并在元素上打一个 data-summary-source="live" 的标记,方便验证;
  • 现有 26 篇文章的别名已一次性写入(ai:summary:p:<abbrlink>,TTL 与正文缓存一致,30 天);
  • 新文章:第一次有人打开文章页,就会顺手把这张”目录卡”写好,首页下次刷新自动跟上。

后记

这次改动最麻烦的不是 CSS,是”为什么首页拿不到摘要“这个问题。表面看是”接口不给我数据”,实际是键的设计:缓存按内容指纹编址,而首页手里只有文章标识。

补一层 abbrlink → 摘要 的别名,问题就没了。这类”看起来是权限问题、其实是寻址问题”的坑,值得记一笔。

几个能复用的经验:

  1. 给卡片加新样式,优先”加类名 + 新 CSS 文件”,而不是复制一份模板。模板会分叉,样式不会。
  2. width: 100% 和 margin 一起用必然溢出,块级元素让它自己撑开就好。
  3. 样式不生效先想缓存:Hexo 的 CSS 只认入口文件 mtime,改了被 @import 的局部文件必须 clean。
  4. 静态兜底 + 动态升级是做”锦上添花”类功能的正确姿势:接口挂了页面不能挂。
  5. 反代层的缓存会吃掉跨域头,X-Accel-Expires: 0 是最省事的开关。

已知限制:摘要生成依赖模型额度,配额打满时会返回 429 insufficient_quota,此时候选文章的卡片会退回到构建时的快照——不影响阅读,只是不够新。